Posted on Leave a comment

Yucatan Knot

Yucatan Knot

Yucatan-Knot.webp

Yucatan Knot

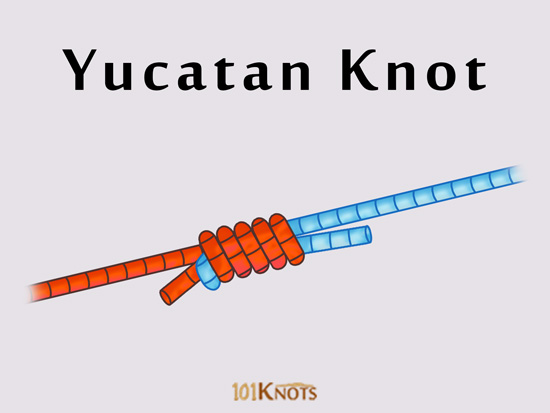
The fishing knot performs well while connecting a doubled main line to a heavy leader. It was originally developed in the sport fishing waters off Isla Mujeres and Cancun. It is stronger than the Albright and the slim beauty and is arguably the strongest knot for mono leader to braided line connections. In the below image, the leader is represented by the red rope and the blue one is the doubled main line. It shows the making of a 6-turn knot.

IMG_3329.jpeg

Tips

  1. In step 3, take care that a considerable length of the red rope is passed through the blue loop.
  2. Breaking strength – When tied with a 22lb braid of .22 mm average diameter and a 30/45 lb leader of 0.56 mm diameter, the braid fails at 100%. With a single strand of braid that has its tag end tied to the leader’s tag end, it fails at 49%.
  3. The double line can be the one provided by a Bimini twistor spider hitch.

Variation

  1. The no name knot or Bristol knot – The leader is wrapped around the doubled main line, the reverse of the Yucatan knot.

Advantages

Disadvantages

The Bimini twist and Yucatan knot combination is stronger than the FG knot

Has been found to slip and fail with a light braid (and certain other types of braids) and a mono leader

Steps to Tying a Yucatan Knot

  1. Lay a bight of the blue rope and the red rope side by side
  2. Wrap the blue rope around the red one 6 times
  3. Pass the red end through the blue loop
  4. Pull both ends to tighten
  5. Trim off excess tag ends
  6. The knot is complete
Posted on Leave a comment

Snell Knot

Snell Knot

Snell-Knot.webp

Snell Knot

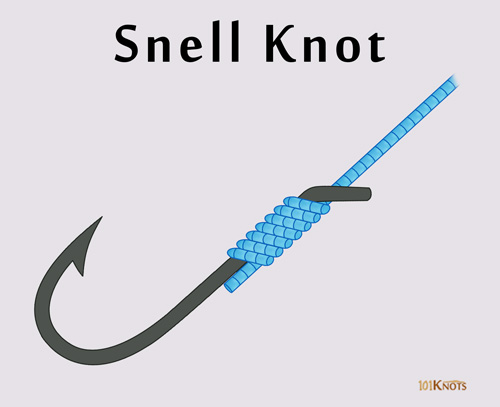
Tying a Snell knot or Snelling a hook allows you to attach a tippet or leader directly to a baited hook. It can be made with braided, monofilament (including heavy mono) and fluorocarbon lines. Though it was originally meant for use with eyeless hooks it is widely used to this date with eyed, spade end, EWG, offset, octopus, treble and other types of hooks. Here the leader or line stays in line with the hook shank.

According to some tests, the breaking strength of the knot has been found to be around 20 pounds with 30-pound fluorocarbon. The diagram illustrates the common or traditional way of tying the powerful knot that is just the reverse of the whip finishing knot

IMG_3328.jpeg

Tips

  1. You can make an easy Snell knot by passing the end of the rope through the hook eye, wrapping it around the standing part 7 times and passing it through the last loop. Pull to tighten in the final step. This version is common when attaching circle hooks to leader lines.
  2. You can also make the knot in the uni version (uni Snell knot) by utilizing the Uni knot.
  3. It can be used for offshore hookups with live baits.
  4. You can tie it perfectly with the aid of a straw, pipe or wire held parallel to the shank of the hook.
  5. You can tie it with yarn as well as heavy leaders.
  6. You need not provide it additional support with glue.

Variations

  1. Double Snell knot- It is made by tying 2 Snell knots to 2 hooks thereby making a double Snell rig.
  2. Sliding Snell knot – This is made by tying the latter wraps along the standing part of the line itself and another line carrying one more Snelled hook. It helps in adjusting the distance between the two hooks.
  3. Egg loop knot– A modification of the Snell knot in which the wraps are made before passing the end through the eye for the second time.
  4. Improved (new) Snell knot – More reliable.
  5. Nail Snell knot – It uses the Nail knot.

Advantages

Disadvantages

• The simple knot is regarded as the strongest hook to line connection due to its ability to distribute friction evenly along the system.

• Does not slip or come loose easily.

• Quick

• Difficult to learn. Needs ample practice.

• It may break with fish having sharp teeth.

Snell Knot v/s Other Knots

  1. Improved clinch knot – It cannot prevent spinning of the bait or any other movements that may go against the bottom current, unlike the Snell knot.
  2. Knotless knot – Better suited for hair rigs.
  3. Nail knot – Cannot be tied with all types of hooks.
  4. Palomar knot – Some experts claim this to be stronger.
  5. Uni knot – Is not tied along the hook shank.
Posted on Leave a comment

San Diego Jam Knot

San Diego Jam Knot

San-Diego-Jam-Knot.webp

San Diego Jam Knot

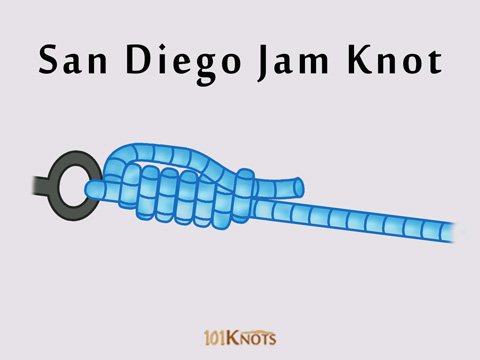
This knot was popular only in the sport fishing capital of San Diego but later gained widespread recognition with anglers all over the world as an excellent knot. It attaches a line to a swivel, hook, artificial fly or clip. Also known as the reverse clinch or the Heiliger knot it can be tied with many types of fishing lines including fluorocarbon, monofilament and braided v/s the Palomar knot that is not as powerful with braid as it is with mono. It has won rave reviews with fishermen.

IMG_3327.jpeg

Tips

  1. You would need less number of turns for a heavy line.
  2. While tightening in step 4, ensure that the individual wraps do not overlap each other and form a neat spiral.

Variation

  1. Double San Diego jam knot – It is tied with a double line or bight instead of a single line. When correctly tied, its strength is greater than the uni knot.

Advantages

Disadvantages

Extremely strong (retains 95% line strength)

Not as strong as the modified uni knot

Quick and easy to tie

Not as strong as the Trilene knot as per the outcomes of knot wars.

Uses

  1. Trolling
  2. Catching big fish.
  3. As a drop shot knot.

How to Tie a San Diego Jam Knot Step by Step

  1. Pass the line thorugh the eye of a hook
  2. Wrap the tag end around the double line 6 times
  3. Pass it through the double line and the 1st wrap
  4. Pull and adjust to tighten knot
  5. Trim off excess and tighten
  6. The knot is complete

Alternatives

  1. Improved clinch knot – Like the San Diego jam, it slides close to the hook. However, it doesn’t perform as well with braid in which it is slippage-prone. Weaker. Wraps around a single line instead of double.
  2. Uni knot – As compared to the San Diego jam that wraps the tag end on the outside of the double line, it is wrapped on the inside of the loop that is created by doubling the line and bringing the tag end back towards the eye of the hook.
Posted on Leave a comment

No Name Knot

No Name Knot

No-Name-Knot.webp

No Name Knot

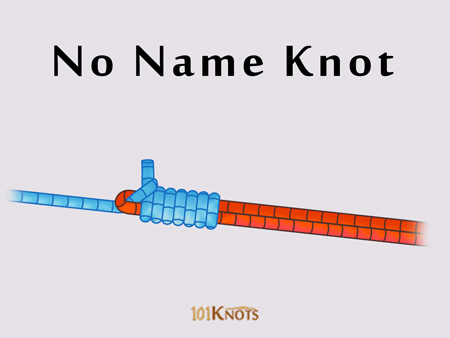
The no name knot, also known as the Bristol knot, involves tying the Bimini twist in 1 rope and wrapping another rope around the loop to join both. The low-profile knot can be used to join a heavier monofilament line to the double line of a spider hitch or any other similar loop knot as well. It passes through rod guides smoothly and can connect braided lines to monofilament. It is quick to tie, simple and fares better than the Albright special and the double uni in terms of strength.

IMG_3326.jpeg

Uses

  1. Fishing
  2. To build a wind on leader

Steps to Tying a No Name Knot

  1. Pass the blue rope through a Bimini twist made with the red one
  2. Wrap it around a bight with the red loop 6 times
  3. Pass it through the blue loop
  4. Pull to tighten knot
  5. Trim off excess, if any
  6. The knot is made
Posted on Leave a comment

Jig Hook

jig.webp

JIG HOOKS

Jig hooks serve as the foundation for lead jig heads and flies. Manufacturers offer them in many styles, sizes, and wire strengths. Anglers of all skill levels rely on jigs to catch salmon, walleye, and bass across a wide range of conditions.

Posted on Leave a comment

Cat’s Paw Knot

Cat’s Paw Knot

Cats-Paw-Knot.webp

Cat’s Paw Knot

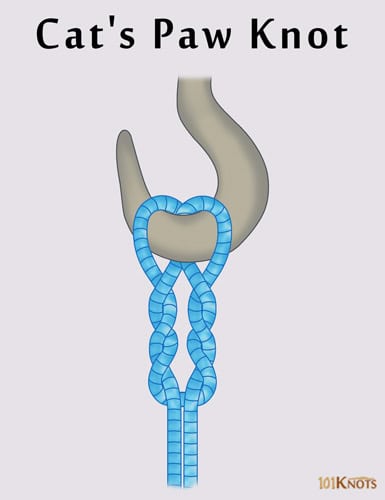
The cat’s paw or offshore swivel knot is used to connect a rope or line to a ring, swivel or hook. The versatile knot is simple to tie and doesn’t jam. It can be used as a sling for lifting heavy loads at any angle. The twisted loops give it good strength and even if one side breaks, the other side will hold temporarily so that the load can be lowered. It finds mention in The Ashley Book of Knots.

IMG_3301.jpeg

Tips

  1. Certain modifications of the knot have additional twists on both the sides of the bight. In fishing monofilament lines it can have as many as 5 turns.
  2. You can use a closed strop or a paracord double line instead of the rope bight.

Advantages

Disadvantages

Doesn’t come undone easily

If both sides of the double line are not kept of equal length, the knot may deform

Cat’s Paw v/s Other Knots

  1. Cow hitch – Weaker. Lacks the twists on both the sides of the knot.

Uses

  1. To lift heavy loads from ships. It is commonly used in docks and wharves.
  2. For loop to loop connections in fishing. It can join a braid to a mono leader and braid to braid. It can be used to directly connect to a Bimini twist.

How to Tie a Cat’s Paw Knot Step by Step

  • Make 2 loops with a rope bight
  • Twist them around themselves
  • Do it for 3 times
  • Take the loops close to each other
  • Pass the hook and pull to tighten
  • The knot is made
Posted on Leave a comment

Spider Hitch Knot

Spider Hitch

Spider-Hitch.webp

Spider Hitch

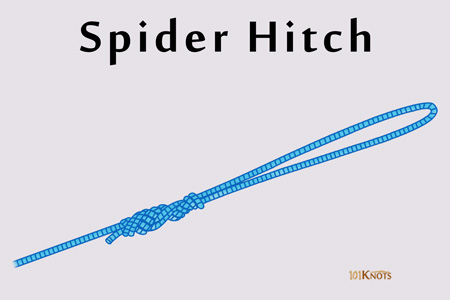
The spider hitch quickly forms a double line or a loop in the line for light tackle fishing. It is easier and faster to tie than the Bimini twist but lacks the latter’s shock absorption capacity. It is also not as durable and effective on small diameter lines like braided lines as the latter. For mono lines, both have almost the same breaking strengths. The Bristol or no name knot is sometimes used to join a heavier leader to the double line of the spider hitch.

IMG_3299.jpeg

Tips

  1. When tying on a braided line, wrap 15 times in step 2.
  2. In step 6, moisten with saliva before pulling for a tight knot.

Advantages

Disadvantages

• Retains most of the line’s strength

• More consistent and faster than the dropper loop

• Creates a strong, large loop in leader and/or tippet

• With proper practice, can be tied in under 10 sec

• Can be tied even in rough weather conditions

• If the wraps do not come out in the proper order while tightening, the knot may fail

Uses

  1. Fishing.
  2. On shark/ tarpon rigs.
  3. Joins a mono leader to braid.
  4. For shore fishing over irregular ground, connects a rubbing leader/ shockleader to a mono mainline.
  5. Provides an option to join the doubled mainline directly to the link or swivel if you are fishing leader-less.

Steps to Tying a Spider Hitch

  1. Make a double line loop holding it between thumb & finger
  2. Pass the end over the thumb
  3. Wrap the end 5 times around the thumb
  4. Pass the end behind the loop
  5. Now pass it through the loop
  6. Pull the end out of the loop
  7. Pull both ends to tighten the knot
  8. Trim excess tag end
Posted on Leave a comment

Uni Knot

Uni Knot

Uni-Knot.webp

Uni Knot

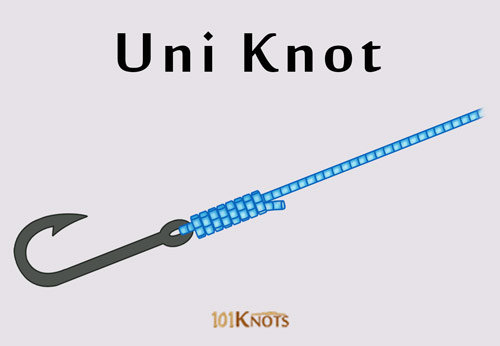
Also known as the Duncan loop or the Grinner knot, the uni knot not only connects your line to the hook but also joins the line to the arbor of a reel or swivel or any other rigging hardware. The uni knot has greater strength than the improved clinch knot, Snell knotand blood knot. It comes in handy when trying to join the line to terminal tackle.

IMG_3298.jpeg

Tips

  1. It saves you time untangling knots. If a tangle is noticed, you don’t have to tie the knot again. Just slide the knot open and take off the dropper, untangle the rest of the rig, slide the dropper back on and continue fishing.
  2. More turns of the line increase the breaking strength of the knot and improve it further.
  3. It is great for fishing a jig in heavy cover on braided or fluorocarbon lines.
  4. The nail knot, in contrast, is a bend and has no sliding loop.
  5. You might have to wet the line to lubricate stiff nylon.
  6. Can be used to fix the line on baitcaster

Variations

  1. Crossover uni knot – The line is connected to the spool with the help of a uni-knot and 2 figure of eights.
  2. Modified uni knot – for braided lines.
  3. New uni knot – Doesn’t weaken over time.


Advantages

Disadvantages

• Strong

• Easy to tie, quick

• Great for mono, braided, heavy mono  and fluorocarbon lines

• Secure

• Versatile

• Maintains 80-90% of the tippet breaking strength as opposed to the clinch knot’s 50%

• Not as strong as the Palomar, Trilene knots or the San Diego Jam

• May fail with nanofil lines

Uni Knot/Duncan Loop Uses

  1. Sea fishing, fly fishing
  2. It is excellent when it ties a leader to your fishing line.
  3. Helps in tying the Snell knot, adding snelling to hooks.
  4. For making bobber stops
  5. Good for tuna fishing
  6. Attaching line to lure

How to Tie a Uni Knot Step by Step

  1. Pass the line through the eye of the hook and make a loop with the tag end
  2. Wrap the tag end multiple times over the line
  3. Take it out of the loop
  4. Pull the tag end and the standing part
  5. Make the loop of the desired size by pulling the standing part. Trim off excess tag end
Posted on Leave a comment

Non-Slip (Kreh) Loop Knot

Non-Slip (Kreh) Loop Knot

Non-Slip-Kreh-Loop-Knot.webp

Non-Slip (Kreh) Loop Knot

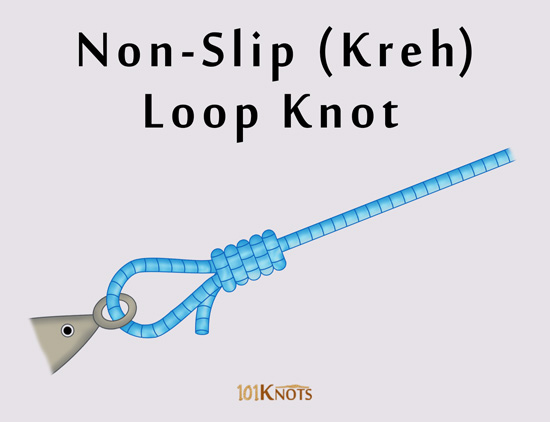
The non-slip loop knot or non-slip mono loop is also known by the names Kreh loop knot and Lefty Kreh’s loop knot since the fishing legend Lefty Kreh popularized it. As it doesn’t grip the lure or fly, it forms a flexible attachment giving it free, natural movement. It can be tied in monofilament, fluorocarbon as well as braided leaders.

IMG_3297.jpeg

Tips

  1. The size of the loop needs to be adjusted while the turns around the standing part are still loose. Once it is tightened, the loop size cannot be altered.
  2. The number of turns made in step 2 depends on the strength of your fishing line. If it is six to eight pounds you should make around seven turns and if it is 60 pounds or more then around two turns should suffice.

Advantages

Disadvantages

• Very strong

• Does not slip

• Retains most of the line’s strength

• Since the tag end faces the hook, the knot doesn’t catch grass and weed while retrieving the line

• Being more obtrusive than other knots, it may not be suitable for fish that are line-shy

• Fails to be your go-to knot when you don’t want your lure to swing freely on the line, like, when you need to manipulate your plug

Kreh Loop Knot v/s Other Knots

  1. Rapala knot – Has a similar tying process and is equally reliable. But some fishermen find it harder to tie than the Lefty Kreh’s loop.
  2. Perfection loop – Needs a loop to loop connection for attaching the line to a lure.

Uses

  1. Fly fishing.

How to Tie a Non-Slip Loop Knot Step by Step

  1. Pass the tag end through a rope loop, the eye and the loop again
  2. Wrap it 5 times around the standing part
  3. Pass it through the initial loop
  4. Pull both ends to tighten
  5. Trim off excess tag end
  6. The knot is made
Posted on Leave a comment

Rapala Knot

Rapala Knot

Rapala-Knot.webp

Rapala Knot

The Rapala knot is a non-slip loop knot that can be tied directly to the lure allowing it to move naturally and freely. It is extensively used in fly fishing.

IMG_3296.jpeg

Tips

If a swivel or a leader is necessary, you should choose a very light tackle to enable natural motion of the lure.

Advantages

Disadvantages

• Easy to tie

• Good for attaching a fluorocarbon leader line to a lure or hook

• Suits almost all types of crankbaits

• Retains most of the line strength

• Unlike the Palomar knot, does not work on braided lines like Fireline

• The tag end sticks up making it prone to entangling with weeds

How to Tie a Rapala Knot Step by Step

  1. Make a loop, pass the tag end through the eyelet and the loop
  2. Wrap it round the standing line 3 times
  3. Pass it through the second loop
  4. Pass through the loop just formed
  5. Pull both the ends to tighten the knot
  6. Cut any excess off the tag end

Alternatives to the Rapala Loop Knot

  1. Non-slip loop knot – Simpler to tie with no change in strength.

Perfection loop – Used by anglers for loop to loop connections.

Posted on Leave a comment

Circle Hook

circle.webp

CIRCLE HOOKS

Circle hooks work best with live or cut bait and suit anglers who prefer to let the fish hook itself. These hooks slide toward the corner of the fish’s mouth instead of setting deep in the throat. Because of this design, circle hooks reduce deep hooking and support catch-and-release conservation. Anglers use them in both freshwater and saltwater, and billfish tournaments officially require them.

Posted on Leave a comment

Egg Loop Knot

Egg Loop Knot

Egg-Loop-Knot.webp

Egg Loop Knot

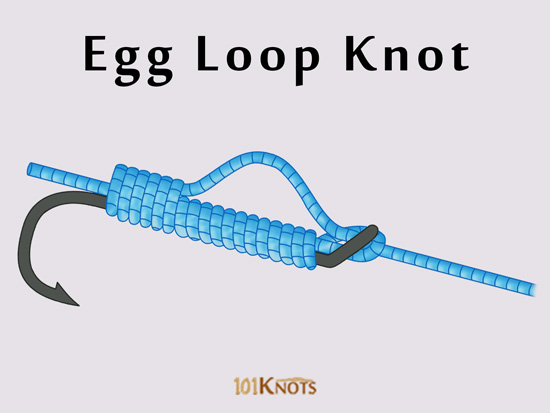
  1. Fish eggs and roe are excellent baits, but it is difficult to attach them to hooks. You can use the egg loop knot to tie your leaders such that they accommodate soft baits such as eggs and keep them from falling off the hook. The knot, also known as bumper knot, is handy for steelhead and salmon fishing. This modification of the Snell knot is also good at securing chicken liver to the hook while fishing catfish.

IMG_3295.jpeg

Tips

  1. You might have to push in the leader a little bit back through the hook eye to form the loop in the last step.
  2. You can directly connect your main line to the hook for this knot.
  3. The initial wraps made in steps 2 and 3 can vary between 10 and 20 in number.
  4. While making the turns, it is very important to maintain tension and make them tight avoiding overlaps so that they don’t unravel.
  5. You should pull the rope in step 8 tightly because that decides the correctness of the knot. Everything should be cinched.

Variations

  1. Double egg loop knot – It helps you attach a puff ball or yarn ball for fishing salmon or steelhead. Here, a doubled line is passed through the hook eye instead of the single rope end as shown in step 1 above.
  2. Double hook egg loop knot – Sometimes, a long tag end is left while tying that is used to tie a second hook in an egg loop knot. The first one holds the bait while the second one actually catches the fish.

How to Tie an Egg Loop Step by Step

  1. Pass the rope end through the hook eye
  2. Wrap it around the standing part 3 times
  3. Wrap it 9 more times
  4. Pass it through the loop
  5. Take the loop so formed, up
  6. Wrap it around the standing part
  7. Wrap it 5 more times
  8. Hold and pull the long end to tighten
  9. Pull the rope up
  10. Place the eggs in the gap
Posted on Leave a comment

Carlisle Hook

charlisle.webp

CARLISLE HOOKS

Carlisle hooks use a round bend, an extra-long shank, and a straight offset point. The long shank helps keep bait secure and reduces the chance of fish swallowing the hook. Anglers commonly use Carlisle hooks with minnows or nightcrawlers when targeting panfish or bream.

Posted on Leave a comment

Aberdeen Hooks

aberdeen.webp

ABERDEEN HOOKS

Aberdeen hooks feature a slightly squared round bend and a wider gap between the point and shank. This design makes them ideal for baiting minnows. The light wire minimizes damage to live bait, allowing it to stay alive and swim longer. Eagle Claw Aberdeen hooks bend before they break, which helps anglers fish confidently in brushy water. These hooks work especially well for panfish, crappie, and ice fishing.

Posted on Leave a comment

Drop Shot Rig Knot

Drop Shot Rig

Drop-Shot-Rig.webp

Drop Shot Rig

What Is It

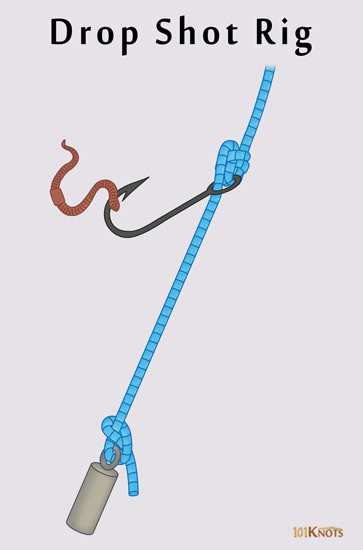
Drop shotting is a popular technique used by bass fishermen although saltwater anglers invented it. It involves suspending the bait (that could be a live or dead bait or an artificial one such as a plastic worm) at a certain level above the bottom of a water body so that it is placed in front of the fish. It also allows easy removal of the bait from the gunk at the bottom. After the weight is vertically dropped to reach the bottom, you can lightly shake the bait for attracting attention. Pro bass fishermen on the West Coast introduced it to the bass fishing world where it spread quickly. It was more so since the “finesse” technique was highly successful in the pressured lakes of West.

IMG_3282.jpeg

Tips

  1. Note that steps 1-5 make the Palomar knot.
  2. The knot made by steps 7 and 8 is the overhand knot.
  3. The best hooks for drop shot rigging are sizes 1 and 2 though you can do it with hook sizes ranging from 2/0 to 6.
  4. It can be used for casting out from the shore as well as straight down from boats.
  5. It can be wacky rigged.
  6. You can set up a drop shot rig for perch, catfish, bluegill, lake trout, smallmouth bass, etc.

Variation

  1. Double drop shot rig – Uses two hooks and is suitable for both fresh and saltwater fish. It is good for ice fishing.

Uses

  1. You can catch crappies, walleyes, trout, pikes, with drop shot fishing rigs.

How to Tie a Drop Shot Rig Step by Step

  1. Pass a rope bight through the hook eye and wrap it around the loop formed
  2. Pass it around the hook
  3. Bring it up
  4. Pull the standing part to tighten
  5. Pass the tag end through the hook
  6. Pull it out
  7. Loop it passing through the weight and feed the end into it
  8. Hold the standing part and tighten the knot
  9. Hook a worm and the drop shot rig is made
Posted on Leave a comment

FG Knot

FG Knot

FG-Knot.webp

FG Knot

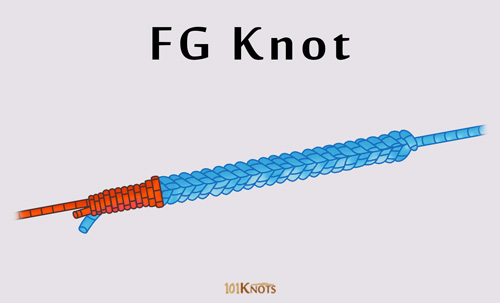
Also known as the Sebile or GT knot, it connects the leader to the main line. It could be braid to a mono or fluorocarbon leader. It is popular with sport fishing skippers in Australia mainly and all over the world. It might seem difficult at first, but with practice, you can do it quite easily and fast, in just about 30 seconds to be precise. That should be reason enough for it being your go-to leader knot. It is a good alternative to expensive wind on leaders. It has emerged a winner is most strength tests with knots for the same purpose. Though there are multiple ways to tie, many of which have been touted tough, we choose to stick with one of the simpler versions popularized by Captain Jason Ehrlich of Australian.

History

The FG (full form fine grip) knot was originally designed by GT fishermen who found their line to line connections giving way due to the hard fighting giant fish. They also wanted something that could easily pass through the guides since they were mainly casting poppers and swim baits.

Steps for Tying an FG or GT or Sebile Knot

Steps-for-Tying-an-FG-Knot.webp

Tips

  1. The key to successful tying is to maintain tension on the lines.
  2. It is important to do the tightening at the designated steps to lock the coils in place. Otherwise, the knot may slip and fail.
  3. It is not recommended to put super glue on the knot as it tends to crack when it is under pressure. That can create sharp edges compromising the line. Moreover, the junction loses pliability.
  4. It can get weak if you make mistakes in tying.
  5. It is better to learn to tie this knot than relying on swivels that can weaken the fragile main line and damage rod guides. It also takes more time to tie 2 knots to a swivel than tying a single line to line knot.

Variation

  1. PR bobbin knot – Is tied with a bobbin.

Advantages

Disadvantages

• Extremely strong

• Reliable

• The small size allows it to pass easily through rod guides

• Complex

• Time consuming for people unfamiliar with it

• Cannot be used for braid to braid connections

• Doesn’t work well in lighter lines

• Doesn’t hold on well to mono to mono connections either. Using a Rizzuto finish instead of the half hitches might be helpful.

• Problematic to tie on Nanofil lines that are super slick, wiry and not soft like braid

FG Knot v/s Other Knots

  1. Uni to uni or double uni knot – Thicker and lower breaking strength. Better for mono to fluoro connections.
  2. Alberto (modified Albright) knot – Weaker and thicker.
  3. Albright knot – Weaker and thicker.
  4. Bimini twist – When combined with the double uni, Yucatan and Albright knots, it was found to be weaker than the FG knot. However, on coupling with the FG itself, it is found to be stronger.
  5. Improved Albright knot – Thicker, weaker.
  6. Slim beauty knot – Weaker and tougher to tie, mostly in low light conditions. Larger.

Uses

  1. Necessary for anglers who cast or jig for big and powerful game fish like tuna, GT (giant trevally), etc.
  2. Bass fishing.
  3. While setting up rigs.
  4. With shock leaders for surfcasting.
  5. For popping and jigging.

Steps to Tying an FG Knot Tutorial

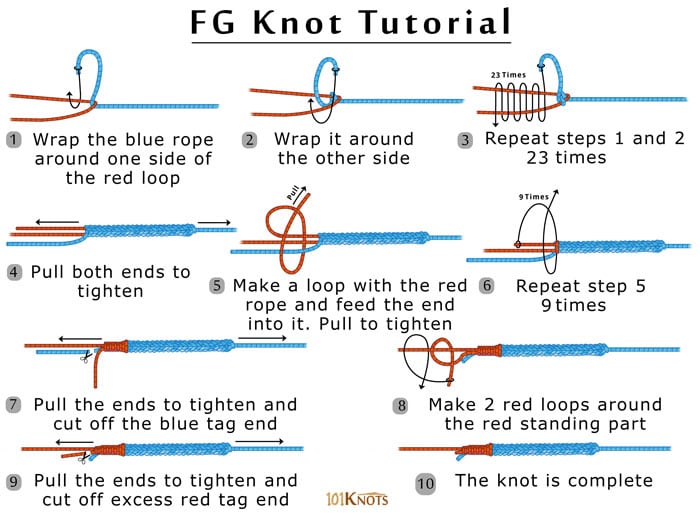
  • Wrap the blue rope around one side of the red loop
  • Wrap it around the other side
  • Repeat steps 1 and 2 23 times
  • Pull both ends to tighten
  • Make a loop with the red rope and feed the end into it. Pull to tighten
  • Repeat step 5 9 times
  • Pull the ends to tighten and cut off the blue tag end
  • Make 2 red loops around the red standing part
  • Pull the ends to tighten and cut off the excess red tag end
  • The knot is complete
Posted on Leave a comment

Perfection Loop Knot

Perfection Loop

Perfection-Loop.webp

Perfection Loop

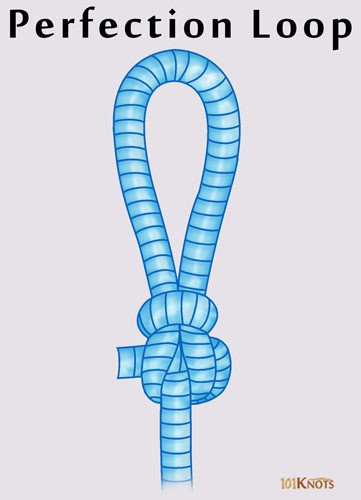
This strong clean loop has the standing end of the line coming out of it in a straight line. Also known as the Angler’s loop as referred to in The Ashley Book of Knots, it is one of the easiest fly fishing knots to create a small loop at the end of a tippet or leader that is completely in line the standing part. A loop to loop connection is often used to join a perfection loop in the fly line with another in the leader. It is also used to join small lures and hooks to a fluorocarbon leader via the said connection and for attaching backing to fly line.

IMG_3281.jpeg

Tips

  1. While connecting a braided line to a mono leader, it is better to use a surgeon’s loop knot on the former and the perfection loop on the latter.
  2. It ranks much higher in effectiveness than the bowline and is also simpler to tie.
  3. Works on both light and heavy mono and fluorocarbon lines.
  4. Surgeon’s knot might be slightly simpler to tie, but it has a bulkier form.
  5. Effectively attaches a streamer to your tippet end allowing free life-like movement of the former.
  6. It is perfect for building leaders that can be clipped to a swivel.

Advantages

Disadvantages

• Slim when drawn tight

• Stable in both fresh and saltwater

• Allows convenient and quick leader changes with loop to loop connections.

• Easily tied with hands

• Size can be adjusted to make a micro loop as per choice

• One of the few knots that holds well in bungee cord

• Reliable in slippery and fine lines as well

• Jams badly

• Not suitable if the knot needs to be untied

How to Tie a Perfection Loop Step by Step

  1. Make a loop with the tag end
  2. Loop once more and bring the tag end to the middle of the 2 loops
  3. Pass the 2nd loop through the 1st one
  4. Hold and pull in both directions to tighten
  5. Cut off excess tag end if any

Alternatives

  1. Bimini twist – Creates a powerful loop that works as a double-line leader at the end of fishing line. It can later be used for a loop to loop connection.
  2. Dropper loop – Helps in making multiple hook bait rings on a fishing line.
  3. Figure 8 loop – Bulkier, more suited for climbing.
  4. Rapala knot – Directly attaches the lure to the line without the need for any loop to loop connection.
  5. Nail knot – If you don’t like loops, you can go for this one for joining lines of different diameters.
Posted on Leave a comment

Two Half Hitches Knot

Two Half Hitches

Two-Half-Hitches.webp

Two Half Hitches

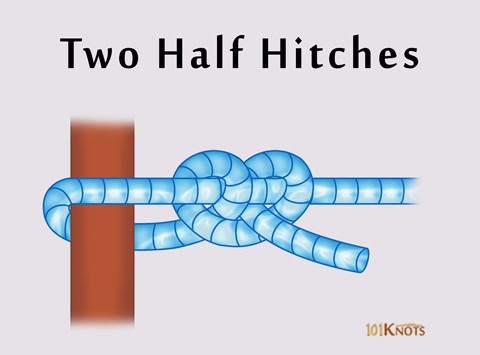
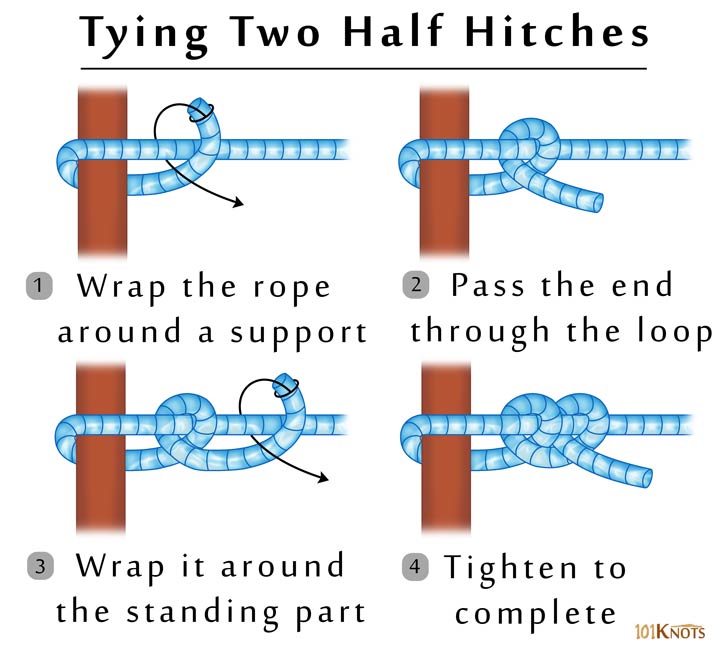
Also known by the names double half hitch and clove hitch around itself, this knot is an overhand knotfollowed by a half hitch. The Ashley Book of Knots states that Steel gave it its name in 1794. It can be tied around a ring, dock, post, tree, etc. It is commonly used in mooring and general utility. It is helpful in moving large objects, for example, logs.

How to Tie Two Half Hitches

How-to-Tie-Two-Half-Hitches.webp

How to Tie Two Half Hitches

Tips

  1. Pry apart the 2 hitches with a bending motion to untie.
  2. It is secure only when it is tied tightly around the support.
  3. Capsizing the 2 half hitches might end up making the granny knot, one of the poorest performing knots.

Variations

  1. Slipped double half hitch – Easier to untie. Here, a bight of the rope is passed through the second half hitch instead of the free end.
  2. Round turn and two half hitches – The double half hitch is a part of this simple knot. It is better for securing things to boats and posts having small diameters. It is easier to untie.

Apart from the above, the vertical, horizontal, diagonal and reverse double half hitches are unique variations used in macramé patterns.

Advantages

Disadvantages

• Non-jamming release

• Adjustable

• Secure

• Ties quickly

• Difficult to untie

Double Half Hitch v/s Other Knots

  1. Clove hitch – It is tied directly to the spar, unlike the two half hitch knot that makes a turn around the spar before being fastened around its own standing part.

Uses

  1. To tie guy lines to a dining fly.
  2. Making macrame bracelets, etc.
  3. Tying boats to pilings.
  4. Securing the ends of a rope that ties things to the top rack of a van.
  5. Two half hitches and a taut line hitch are used to set up tents.
  6. By Boy Scouts.
  7. When added to a timber hitch near the hauling end, helps in hoisting and prevents the load from twisting.
  8. In weaving.
  9. Stringing tennis rackets and fly tying in fishing.
  10. In casting methods for cattle handling.

How to Tie a Two Half Hitches Step by Step

  1. Wrap the rope around a support
  2. Pass the end through the loop
  3. Wrap it around the standing part
  4. Tighten complete

Alternative

  1. Buntline hitch – More secure but more liable to jam.
Posted on Leave a comment

Half Hitch Knot

Half Hitch

Half-Hitch.webp

What Is a Half Hitch Knot?

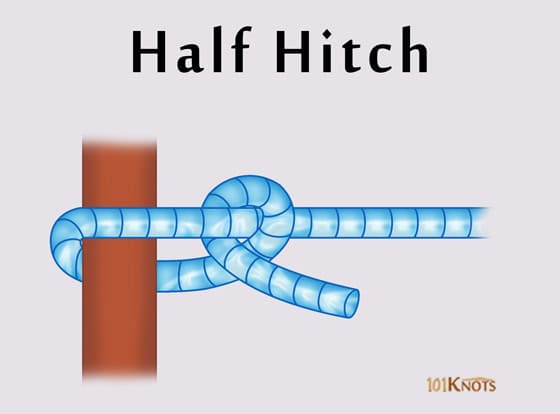
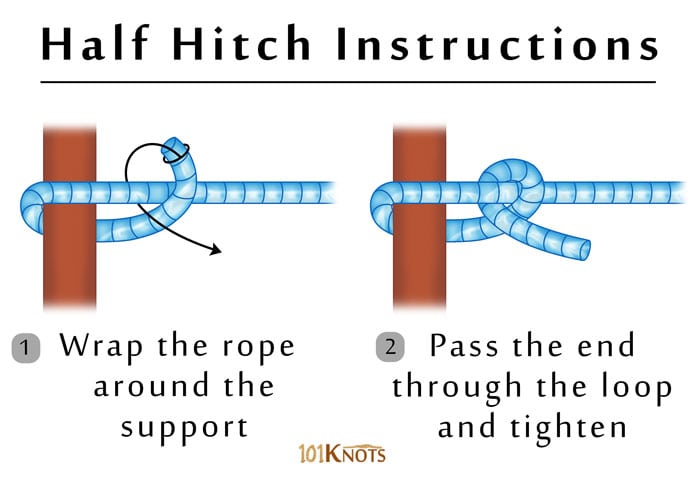
It is basically an overhand knot with the working end brought over and under the standing part. Though it is insecure by itself, it forms the basis of many other reliable knots. It may be used for decorative purposes as in French whipping. The quick release knot has an ancient origin and is described in The Ashley Book of Knots. The overhand and single half hitch knots have different appearances and the latter necessarily requires a support for the initial loop to be made.

How to Tie a Half Hitch

How-to-Tie-a-Half-Hitch.webp

Variations

  1. 2 half hitches or double half hitch – Stronger. Consists of an overhand knot followed by a half hitch knot.
  2. Slippery half hitch – A bight of rope is passed through the loop instead of an end. It prevents jamming.

Uses

  1. Fishing with bait (can be used on pilchards, squid, prawns, etc.).
  2. Fly tying in fly fishing.
  3. Making paracord survival bracelets, can koozies (sometimes in a slightly modified form).
  4. In beading and jewelry (like necklace) making.
  5. Casting on stitches in knitting.
  6. In crochet, weaving.
  7. Pulling of wire by electricians.
  8. Making dream catchers, yarn buckles, friendship bracelets.
  9. Forms parts of the cleat, clove, cow, timber, rolling hitchesamong others.
  10. An easier alternative to the square knot for tying sutures in surgery.
Posted on Leave a comment

Palomar Knot

Palomar Knot

Palomar-Knot.webp

What is a Palomar Knot

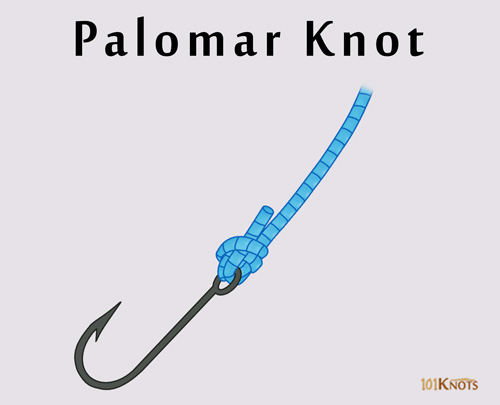
The easy to tie, strong Palomar (pronunciation PAHL-oh-mahr) knot attaches a fishing line to a hook, snap or swivel and a fly to a tippet or leader. Though it is good for monofilament and fluorocarbon fishing lines, it performs best with braids. With just a little practice, you can tie it even in the dark and with cold hands. Its breaking strength was found to be 14lb to 15 lb based on certain tests done with braided lines. It is popular among saltwater anglers who have given it good reviews and ratings.

How to Tie a Palomar Knot

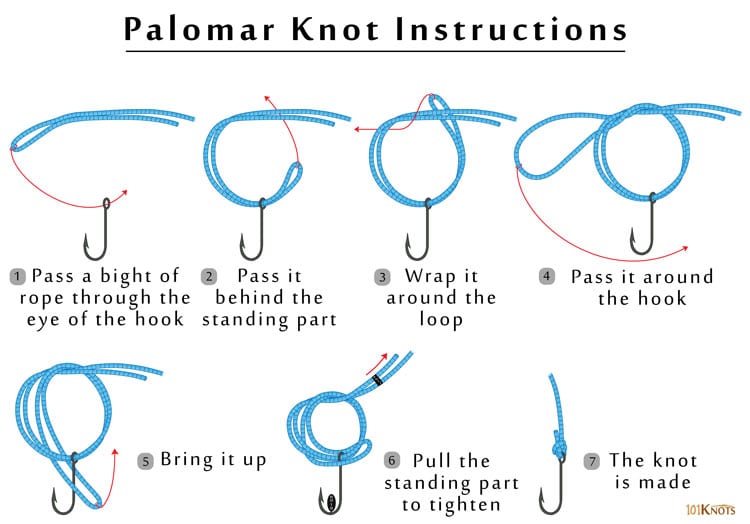
The printable diagram below shows you the tying procedure step by step. You have to start with about six inches of a doubled main line.

How-to-Tie-a-Palomar-Knot.webp

Tips

  1. Trim off excess tag ends, if any, in the final step.
  2. Ensure that all parts of the knot are secured together properly when the lure or hook is passed through the loop as shown in step 4.
  3. Note that an overhand knot is formed in step 3.
  4. The knot is formed around the bight right below the eye. This leaves the hook free for rotation around the knot. In some erroneous illustrations, the final loop is shown positioned against the shaft of the hook that restricts its movement.
  5. Do not cross your lines midway while tying the knot. It severely compromises the knot strength and might cause it to break.
  6. It can be used to connect lead core lines to swivels by breaking off the lead at the tip by a few inches.
  7. It is not recommended for heavy mono leaders. It suits light lines more.

Variations

  1. Double Palomar knot – Employs two wraps instead of one as pictured in step 3 above.
  2. Improved Palomar knot – It is a modified version that boasts of greater However, it’s not as strong as the improved uni knot for braids.

Advantages

Disadvantages

• It retains almost 100% of the original line strength

• When tied perfectly, it is almost impossible to get it loose

• It has a non-jamming release

• It can be awkward to pass the fly or hook through the loop while tying the knot and it requires a large loop

• Not suited for making hair rigs. The knotless knot is better in this regard.

Palomar Knot v/s Other Knots

  1. Trilene knot – It is more prone to slippage, though an equally strong alternative.
  2. Improved clinch knot – Not suitable for braided lines, unlike the Palomar.
  3. Snell knot – Weaker knot suitable for circle hooks.
  4. Uni or Grinner knot – Weaker alternative.
  5. Clinch knot – Doesn’t suit braided lines. Same goes for the Rapala knot.
  6. Fisherman’s knot– It is a bend and not a hitch.

Uses

  1. Tying drop shot rigs.
  2. Fly, carp, catfish, tuna, musky, surf and bass fishing.
  3. Tying crankbaits, spinnerbaits and
  4. Magnet fishing.
  5. Other fastening applications like attaching a dog clip to a rope.

How to Tie a Palomar Knot Step by Step

  1. Pass a bight of rope through the eye of the hook
  2. Pass it behind the standing part
  3. Wrap it around the loop
  4. Pass it around the hook
  5. Bring it up
  6. Pull the standing part to tighten
  7. The knot is made