Posted on Leave a comment

Turle Knot

Turle Knot

Turle-Knot.webp

Turle Knot

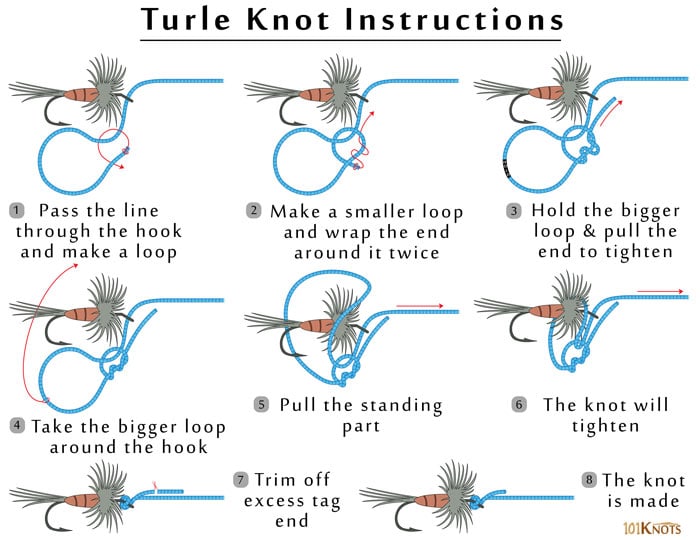
Named after Major William Greer Turle, a 19th-century English angler who didn’t claim to have invented it but popularized the knot, the Turle knot is widely known for connecting a fly or hook to a leader. It can be used with the turned up or turned down the eye of a hook. This version of tying the knot is also referred to as the improved Turle knot. The specialty of the knot is that the line emerges perpendicular to the hook shaft.

How to Tie a Turle Knot

How-to-Tie-a-Turle-Knot.webp

How to Tie a Turle Knot

Tips

  1. If you want you can tuck the tag end through the bigger loop before doing step 5 though the step is optional.
  2. Note that a type of adjustable slip knot is made in step 3.

Variation

  1. Double Turle knot – The bigger first loop is made with a double line instead of a single one.

Advantages

Disadvantages

• Strong

• Since the knot doesn’t snug down the hook eye, the fly can swim better

• It can be used with thin as well as thick lines

• Doesn’t work well with flies having eyes far bigger than the leader

• Not suitable for modern leaders that are quite soft. The double Turle is better in this respect

Uses

  1. Fly fishing
  2. By steelhead and salmon anglers.
Posted on Leave a comment

Arbor Knot

How to Tie an Arbor Knot

How-to-Tie-an-Arbor-Knot.webp

Tips

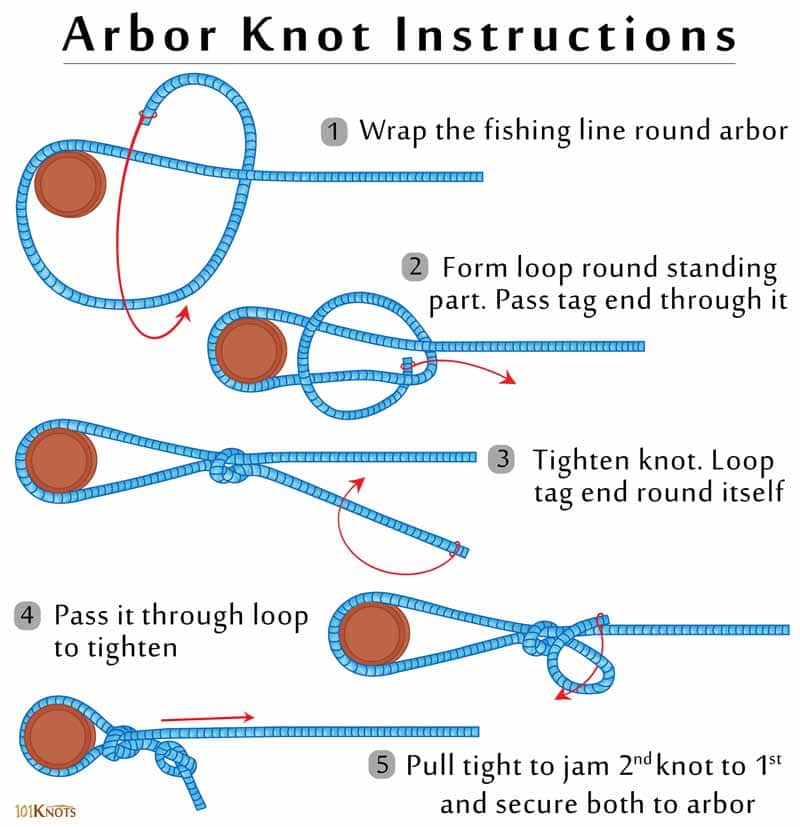
  1. The knots made in steps 3 and 5 are known as overhand knots. The second overhand knot prevents the line from slipping through the first one.

Variation

For increasing friction on highly polished reels, some fishermen wind the line 2-3 times round the arbor before making the first knot. The line should be turned as though tying a tensionless knot, that is, the wraps should tighten on rotating the reel.

Advantages

Disadvantages

• Simple to tie and effective.

• Does not slip while winding the fishing line onto the spool.

• A good choice for fluorocarbon and monofilament lines.

• Can be used with braided superlines or unifilaments only if the spool is non-slip and braid-ready.

Steps to Tying an Arbor Knot

  1. Wrap the fishing line around arbor
  2. Form loop round standing part. Pass tag end through it
  3. Tighten knot. Loop tag end round itself
  4. Pass it through the loop to tighten
  5. Pull tight to jam 2nd knot to 1st and secure both to the arbor.
Posted on Leave a comment

Surgeon Loop Knot

How-to-Tie-a-Surgeons-Loop.webp

How to Tie a Surgeon’s Loop

Tips

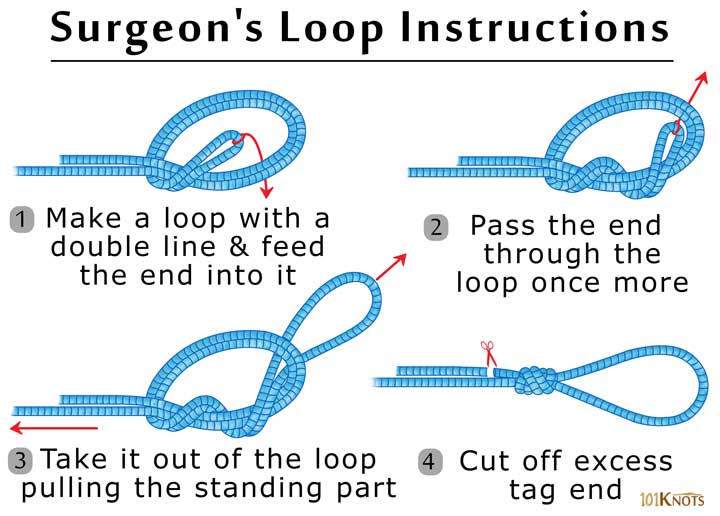
  1. While tying the above, you are basically creating a loose overhand knot and passing the end one more time through the knot. It is nothing but doing a double overhand knotwith a bight of rope.
  2. Unlike the dropper loop that forms a loop standing at right angles to the line, the surgeon’s loop makes a loop at one end.

Variation

  1. The triple surgeon’s loop – To do this, you need to first create a loose overhand knot with a bight of rope and pass the end twice through the initial loop instead of once as with the surgeon’s loop knot. It is more secure.


Advantages

Disadvantages

• Strong

• Reliable

• Easy

• Retains majority of the line strength

• Bulky

• Not recommended if you want to connect braid and mono surgeon’s loops. A double uni or a modified Albright knot better suits the purpose.

Uses

Steps to Tying a Surgeon’s Loop

  1. Make a loop with a double line & feed the end into it
  2. Pass the end through the loop once more
  3. Take it out of the loop pulling the standing part
  4. Cut off the excess tag end

Alternatives

  1. Bimini twist – It is stronger.
  2. Perfection loop – The loop is in a straight line with the standing part versus the surgeon’s loop that is a bit bent.
  3. Spider Hitch – It is a bit more complex though having roughly the same strength.
Posted on Leave a comment

Hook size chart

Hook-Sizes-181_rev0321-800x341.png

Size charts can help guide purchasing decisions when you are unable to view hooks in person. Check the size charts in above making it easier for anglers to select the correct hook size.

By following these tips, you can choose the right hook size and improve your chances of success on your next fishing trip.  Next week, we will get more into hooks kinds/sizes and how they are used.

Posted on Leave a comment

Clinch Knot

Improved Clinch Knot

Improved-Clinch-Knot.webp

Improved Clinch Knot

If you want to tie your fishing line securely to a hook, swivel or lure, the improved clinch knot would be your best bet. The widely used fishing knot scores above the regular clinch knot owing to an extra tuck under the final turn making it suitable for holding on to strong fishes.

IMG_3280.jpeg

  1. Tighten the knot by pulling on both ends

Tips

  1. Give yourself enough length to work with as you require wrapping it 5 or even more times for a powerful knot. For heavier lines, though, you may reduce the turns to 4.
  2. Keep the cord moist and pliable so that it can be pulled. A ChapStick comes in handy for the purpose.
  3. You may cut the tag end if there is any excess.

Variant

  1. Clinch knot – An inferior version, it is a basic knot for fly to tippet connections.

Advantages

Disadvantages

• Quick and easy to tie.

• Reliable.

• Allows fixing up a tippet of small diameter to a heavy wire hook.

• Difficult to tie on heavy lines. Not recommended for those testing more than 30 lb breaking strength.

• Not suitable for braided lines. Hence, inferior to the Palomar knot.

Uses

    1. Commonly used for fastening the leader to the fly.
    2. Popular for tying terminal tackle to a monofilament line.

How to Tie an Improved Clinch Knot Step by Step

  1. Pass the working end through the eye of the hook
  2. Wrap it 5 times around the standing line
  3. Pass it through the first loop
  4. Pass it under the bigger loop just created
  5. Tighten the knot by pulling on both end

Alternative

  1. Trilene Knot – A superior knot specialized in tying monofilament lines.
Posted on Leave a comment

Blood Knot

IMG_3275.jpeg

Variations

  1. Improved blood knot – Fares well in connecting a thicker line to a thinner one. For example a heavy shock material to a lighter class tippet.
  2. Half blood knot – For attaching a fishing hook to the line. It can also join a line to a snap, swivel or lure.

IMG_3277.jpeg

Uses

  1. In fly fishing.
  2. To construct fishing leaders.
  3. As a decorative stopper knot in sailing
  4. For leader to tippet and line to leader connections.

Steps to Tying a Blood Knot Directions

  1. Wrap the red rope around the blue one 5 times
  2. Pass the red one through the central loop formed
  3. Wrap the blue rope around the red one
  4. Make 5 turns
  5. Pass the blue one through the central loop
  6. Pull the tag ends and the standing parts to tighten
  7. Cut off the tag ends
  8. The red and blue lines are now joined

Alternatives

  1. Double surgeon’s knot – Slips less though weaker.
  2. J knot – Slightly more powerful albeit difficult to tie.
  3. Double uni– Stronger for braided lines.
  4. Uni knot – Sturdier and less unwieldy.
  5. Uni to uni – Retains around 90% of the line strength making it more robust.
  6. Albright knot – Joins lines of different diameters.
  7. Double fisherman’s knot – Employs fewer twists in the 2
  8. Nail knot– Unites varying diameter lines. Also used in carp fishing versus the blood knot’s use in fly fishing only.
Posted on Leave a comment

Nail Knot


Tips

  1. You can use a nail knot tool or device to tie a number of nail knots fast.
  2. If you want, you can make a nailless nail knot by hand without using any tool whatsoever.

Variation

  1. Double nail knot – Instead if a single one, two standard nail knots are formed at the end of each line.

IMG_3273.jpeg

Uses

  1. In fly fishing
  2. To make the nail loop knot that is strongest yet slimmest way to make a loop at the end of a fly line. Can be used on a hook or swivel just like the improved clinch knot.
  3. For attaching a monofilament/braided fishing line to lead core leader material by carp anglers.
  4. As a bobber stop.
  5. Splicing a mono leader into a hollow braid.

IMG_3274.jpeg

Uses

  1. In fly fishing
  2. To make the nail loop knot that is strongest yet slimmest way to make a loop at the end of a fly line. Can be used on a hook or swivel just like the improved clinch knot.
  3. For attaching a monofilament/braided fishing line to lead core leader material by carp anglers.
  4. As a bobber stop.
  5. Splicing a mono leader into a hollow braid.
Posted on Leave a comment

Albright knot

Albright Knot

Albright-Knot.webp

Albright Knot

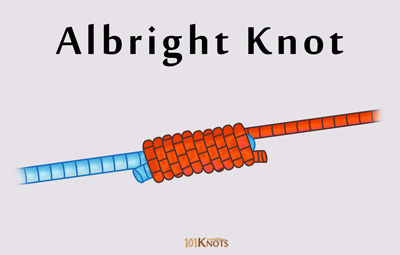
The Albright knot, also known as the Albright special knot joins 2 fishing lines of different materials and diameters together. The line to line connections could be monofilament to braided, Spectra/braided to wire, mono to single strand wire, braid to braid, mono to fluoro, mono to mono etc. It is commonly used to unite fly line to backing. It slides smoothly through the guides when a fish pulls out a lot of line so as to reach your backing. For fly fishermen it provides a great option to connect Dacron backing to fly line.

Albright Knot Step By Step

  1. Pass the red rope through the blue loop
  2. Twist the red rope around the blue standing part
  3. After around 10 turns pass the red tag end through the blue loop
  4. Pull the ends at the opposite sides to tighten the knot
  5. Trim excess tag end
  6. The knot is made

IMG_3268.jpeg

Tips

  1. The blue loop in step 1 should be made with the heavier line.
  2. When you already have a loop knot in the main line like the Bimini twist, surgeon’s loop or spider hitch, it makes good sense to have this knot for splicing the leader.
  3. Can join a copper fishing line to leader.
  4. You can put in some super glue for added security.
  5. Swivel, hook or any other hardware is not required at the junction. The uni knot is different as it connects the line to a hook.
  6. It can be used with leadcore.
  7. Securing the knot with a 3-turn uni lock prevents slipping and ensures smooth passage through guides.
  8. The FG knot was found to possess greater breaking strength.
  9. The Bristol knot combined with the Bimini twist creates fine light-tackle line to leader connections in contrast to the Albright knot that splices the main line to a heavier leader.

Variations

  1. Improved Albright knot – Easier and stronger.
  2. Modified Albright knot – Also known as the Alberto knot it is fairly easy to tie and is extremely strong. Recommended for joining braid to leader. As per tests, has a higher breaking strength for braid to fluoro.
  3. Double Albright knot – Connects a braided line to mono or fluoro.
  4. Reverse Albright/Yucatan knot – Employs 5-6 wraps for a mono main line and 10-12 wraps for a braided main line around the leader. Deemed the strongest mono to braided line knot.

Advantages

Disadvantages

• Versatile

• Strong

• Compact

• Works with different materials

• Can slip with braid to fluorocarbon

Uses

  1. Carp fishing.
  2. Great for attaching fly line to leader.
  3. Jigging.
  4. Making combi rigs.
  5. Sea fishing.
Posted on Leave a comment

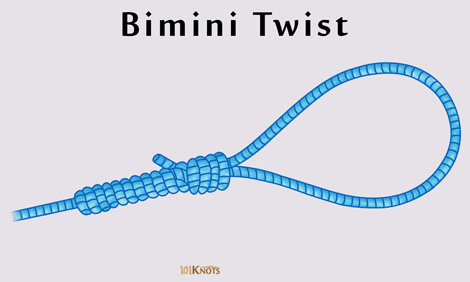
Bimini Twist Knot

Bimini Twist

Bimini-Twist.webp

Bimini Twist

The Bimini twist fishing knot retains almost the entire strength of the line to which it is tied. Hence it is known as a 100% knot. Resulting in a loop at the end of a line that can later be used for loop to loop connections, it can successfully be used to make a double line leader.

IMG_3269.jpeg

Tips

  1. Keep a long tag end while forming the initial loop.
  2. It is important to cinch the initial twists to prevent the knot from slipping.
  3. As the twists start tightening, moisten the knot for increased effectiveness.
  4. While doing steps 3-7 you should maintain pressure at both the ends of the loop.
  5. 20-30 twists are ok for a nylon mono while 60 or more should do for Spectra-type braids.
  6. Give a neat finish with a half hitch around both the legs instead of one followed by a 6-turn reverse uni pulled up very tight. You can also try out the Rizzuto finish (a type of whipped finish).
  7. After creating the double line with the knot, you can nicely connect it to a swivel or a wind-on leader with a Cat’s paw.
  8. An FG knot is a slim but powerful option to connect the double line to the leader.
  9. Though it seems complicated at first and some people find it better to use a tying device, after sufficient practice the method is quick and easy.

Variation

  1. Double Bimini twist – The line is doubled before tying a Bimini twist creating 2 loops instead of one. Good for joining gel spun backing to fly line.

Advantages

Disadvantages

• One of the strongest loop knots like the surgeon’s

• Gives elasticity to the leader

• Effective in both monofilament and braided lines

• Much more effective than a spider hitch that only retains 40-60% of a GSP line’s breaking strength as per noted rigging specialist Geoff Wilson

Uses

  1. One of the best knots to join backing to the fly line using a loop to loop connection.
  2. In big game fishing, sport fishing the ulua.
  3. Strongly joins a snap swivel or barrel.
  4. Helpful to create the double line in a Yucatan knot.
  5. Forms a part of the GT knot for combining mono to braid.
  6. Suitable for attaching a wind-on leader and completing tarpon leaders of maximum tippet strength. Securely unites a shock leader with the running line.
  7. When combined with the no name or Bristol knot forms a fine light-tackle line-to-leader connection significant for free-lining baits, casting and occasional jigging. Plus, its smoothness prevents real baits from flying off the hook while casting. In contrast, the surgeon’s and Albright knotsare better for uniting the main line to a heavier leader.
  8. The Aussie quickie, a good braid to fluorocarbon knot is tied with the Bimini twist on the braided line. However, the double uni, relevant for the same purpose, can do without it

Steps to Tying a Bimini Twist

  1. Loop around support and wrap the tag end 20 times
  2. Pulling the ends apart, draw the turns tight
  3. Slip the end over the turns by pulling it toward the support
  4. Pass it around the upper arm of the loop
  5. Pass it through the small loop below and bring it up
  6. Tighten and wrap around the entire loop 4-5 times
  7. Pull to tighten
  8. Trim off any excess

Alternatives

  1. Dropper loop – A moderately strong knot that makes additional attachments in your fishing line possible.
  2. Perfection loop – Creates a small loop at the tip of a leader or tippet that is completely in a straight line with the standing part.
Posted on Leave a comment

Different hooks for different fish

Fishing success often depends on choosing the right hook size. However, selecting the correct size can be confusing for beginners because hooks do not come in standard sizes. Here are some easy-to-follow tips to help you choose the right hook size.  Each week, I will feature a different type of hook and explain the types of fish they are used for.

Posted on Leave a comment

Looking for a company in Chile to export Tebo worms!

Looking for a company in Chile to buy Tebo/Trevo worms and import into the USA.  Years ago I talked to Bernard Nicolas.  Trying to find him again.

Posted on Leave a comment

How the different bobbers/floats are used for fishing.

Key Types of Fishing Bobbers:

  • Fixed/Snap-on Bobbers: Often round plastic (red/white) or oval foam, these attach directly to the line and stay in place. Ideal for shallow water where the bobber isn’t too far from the hook, allowing for easy casting.
  • Slip Bobbers: These allow the line to pass through a center tube, sliding up to a adjustable knot (bobber stop). They are ideal for deep water or in situations where you want to reel in without a long line trailing, as the float rests near the hook during casting.
  • Wagglers/Pencil Floats: Long, thin, and slender, these are highly sensitive to subtle bites. They are attached to the line at the bottom, making them ideal for fishing in calm water, for finicky panfish, or for fishing at specific depths.
  • Popping Corks: Specialized floats with a concave top that make a “popping” sound when jerked, simulating baitfish to attract species like redfish and trout.
  • Weighted Bobbers: These have weight built into the bottom, allowing for longer, more accurate casts, especially in windy conditions.
  • Lighted/Electronic Bobbers: These include a small light source (LED or chemical) for night fishing, making it easy to see when a fish strikes. 

Materials & Usage:

  • Balsa Wood: Provides maximum sensitivity for detecting light bites.
  • Foam/Plastic: Durable and often used for general-purpose, high-visibility bobbers.
  • Shape: Round bobbers are great for shallow, windy, or rough conditions, while pencil/oval shapes are better for calmer water and subtle bites.
Posted on Leave a comment

How does barometric pressure affect deer hunting?

Barometric pressure significantly influences deer movement and activity levels, serving as a key indicator for peak hunting times. Generally, high-pressure systems (>30.00 inHg) following a cold front trigger increased, often daytime, deer activity and feeding. Conversely, low-pressure systems (falling pressure) often signal stormy weather, which can limit movement, though feeding activity may increase immediately before a storm hits.

Key Takeaways for Hunting:

  • The “Sweet Spot”: Many hunters prefer pressure between 30.01 and 30.40 inHg, with higher pressure often resulting in better, more predictable movement.
  • Best Time to Hunt: The first day of high pressure immediately following a cold front is considered prime time.
  • Low Pressure/Approaching Storms:Deer will often feed aggressively just before a low-pressure system (storm) arrives, but activity drops significantly during the storm.
  • Why It Matters: High pressure usually brings stable, cool, clear weather, which encourages deer to move, while low pressure brings unstable, stormy weather that causes them to bed down.
  • Understanding that pressure dictates when deer feel safe or driven to move is as important as temperature or wind direction
Posted on 1 Comment

How does barometric pressure effect fish?

Barometric pressure significantly impacts fish behavior by affecting their swim bladder, with falling or low pressure (below 29.8 inHg) usually triggering active, shallow feeding ahead of storms, while high/rising pressure (above 30.2 inHg) makes fish lethargic and likely to move to deeper, structure-heavy water.

Key Pressure Trends and Fishing Impact:

  • Falling Pressure (Best Time): As a cold front approaches, pressure drops, causing fish to become highly active and aggressive. They feed heavily, making it an ideal time to use faster, more aggressive baits like spinnerbaits or topwater.
  • Low, Stable Pressure: Often brings cloudy, rainy, or windy conditions. Fish stay active and move into shallower water, feeding freely.
  • Rising/High Pressure (Tough Time):Following a storm, pressure rises, resulting in “bluebird” skies. Fish become lethargic, move to deeper water, and hide near structures. Use smaller, slower, or subtle baits (jigs, plastics) and fish slowly.
  • Rapid Changes: Drastic shifts in pressure typically make fish uneasy and less willing to feed, as they are busy adjusting to the change.

General Rules of Thumb:

  • Ideal Range: Stable pressure between 29.7 and 30.3 inches of mercury (inHg) is generally considered good for fishing.
  • Behavioral Shifts: When the pressure is rising, fish move to cover; when it falls, they hunt.
  • Adaptation: When the barometer is high or rising, fish deeper to find more.
Posted on Leave a comment

Can the color of your clothes effect your fishing success?

The color of your clothes can significantly affect fishing success, especially in clear, shallow water where fish are easily spooked. Bright, contrasting colors can make you more visible to fish, while muted, natural-toned clothing (like olive, brown, or light blue) helps you blend into the surroundings and avoid detection.

Key Takeaways on Clothing Color:

  • Best Colors to Blend In: Light blues and pastels are effective as they blend with the sky, while olive, tan, and camouflage are ideal for blending with tree-lined banks or blue can blend in with the sky reflection.
  • Avoid: Bright, neon, or stark white clothing can make you stand out, potentially spooking fish.
  • Clear vs. Murky Water: In “gin-clear” water, drabs and muted colors are crucial. In murky water, the color of your clothing matters less.
  • Functionality: Beyond color, light-colored clothing is often favored for sun protection, while dark clothing can be hotter, absorbing more sun energy.
Posted on 1 Comment

Largemouth Bass

Largemouth Bass

The largemouth bass is the most popular freshwater game fish in the U.S. Learn more about how you can identify a largemouth bass, where to catch it and what bait and lures to use.

How to identify a Largemouth Bass

The largemouth bass closely resembles the smallmouth bass and other species i.e., spotted bass, redeye bass, etc. Together these fishes form a group that is referred to as the black basses.

The largemouth can be distinguished from most similar species by the fact that its mouth extends at least to, and often beyond the rear edge of the eyes. Also, its first and second dorsal fins are almost separated by an obvious deep dip, and there are no scales on the soft-rayed second dorsal fin.

How to Catch Bass

Catching largemouth bass in ponds, lakes, rivers, or reservoirs can be easier than you might think. If you read and remember these basic bass fishing tips, you can be reeling in America’s favorite freshwater game fish before you know it.

Locate Largemouth Bass Habitat

If you want to learn how to catch bass, the first thing you need to know is how to locate the ideal habitat for this warm water fish species. Largemouth bass prefer shallower areas of freshwater ponds, lakes, reservoirs, and slow-moving rivers that have some type of cover in the form of vegetation, brush, trees, or structure.

One of the key largemouth bass fishing tips to remember is that you will most often find these fish close to cover. Regardless of whether you are fishing from the shoreline or from a boat, try to locate any submerged trees, vegetation, docks, bridges, or changes in bottom depth. Just as when learning how to fish for any other species, finding spots that offer cover or structure is a good first step.

Choose Your Bait or Lure Wisely

Once you have found a freshwater fishing spot that has cover, take a close look at the water conditions and pay close attention to any baitfish or forage you see. For example, if the water is clear and you notice schools of shad swimming near a boat dock or a crayfish crawling along the bottom, you have valuable clues as to what may be the best bait for bass in that area.

Always try to choose a bait or lure that mimics the type of prey that the bass are likely to be feeding on in the waterway where you plan to fish.

  • Spoons and crankbaits are made to imitate shad, shiners, or other types of baitfish. One of the most useful tips for catching bass in cloudy or muddy water is to try a rattling crankbait that will create vibrations in the water. When the water visibility is low, bass can sense vibrations from rattling lures or baits using their lateral line and you may get more strikes.
  • Soft plastic crayfish, frogs, and lizards are creature baits that are made to mimic these types of prey. These types of soft plastic baits can often be rigged so that they are weedless, which makes it easier for to fish around vegetation.

While there are a variety of artificial lures and baits you can use, don’t forget that natural baits are often the best option if you are fishing with kids or beginners.

Posted on Leave a comment

Optional but Recommended Gear

Optional but Recommended Gear

  • Fish Finder/Fl (Flashers): See fish and structure under the ice.
  • Portable Shelter/Shanty: Blocks wind, adds comfort.
  • Heater: Propane heater for inside shelters.
  • Tip-Ups & Rattle Reels: For fishing multiple lines.
  • Headlamp/Flashlight: For low-light conditions.
  • Hand Warmers: For extra warmth.
  • Fishing License: Don’t forget it!.
Posted on Leave a comment

Clothing and Safety

Clothing & Safety

  • Layers: Base, mid, and outer layers, plus waterproof/windproof outer shell (jacket & bibs).
  • Insulated Boots & Socks: Waterproof, insulated boots are crucial for dry, warm feet.
  • Warm Accessories: Hat, gloves/mittens, balaclava/face covering.
  • Ice Cleats: For traction on slippery ice.
  • Spud Bar: To check ice thickness and quality.
  • Ice Picks: For self-rescue if you fall through the ice (wear them around your neck).
  • Rope & Whistle: For emergencies.
Posted on Leave a comment

Ice fishing equipment

Essential Equipment

  • Ice Auger: For drilling holes (hand, electric, or gas).
  • Ice Fishing Rods & Reels: Short rods designed for ice fishing.
  • Tackle: Jigs, spoons, hooks, swivels, weights, and bait (wax worms, minnows).
  • Sled: To pull all your gear across the ice.
  • Seat/Bucket: A 5-gallon bucket works as a seat and storage.
  • Ice Scoop/Ladle: To clear slush from holes.
Posted on Leave a comment

Ice Fishing

Ice fishing

images.jpg

An essential ice fishing gear list includes an auger, rods/reels, tackle, warm layered clothing (waterproof boots, insulated layers), shelter, heater, sled, and safety items like an ice scoop, ice picks, and a spud bar, with electronics like fish finders, tip-ups, and lights adding significant advantages for comfort and success.